Showing posts with label Sewing. Show all posts

Friday, August 15, 2014

INSPIRATION LEADS TO REORGANIZATION OF STUDIO

Hi Everyone!

A steaming hot cuppa coffee in my hand and the mouse in the other, scanning down the page, clicking on this and that, pinning a few, that's how I started my day off !  Don't judge me....it IS my day off from work.  Yes there are a zillion things I need to do today...that blasted phone keeps whistling to remind me of the TO DO list that awaits. 
 You know what I'm talking about too. <wink> It's easy to fall down the (Pinterest) rabbit hole, so limiting my time is important while taking time to be inspired.
My Spring Door Wreath inspired by Pinterest

Spending time being inspired by others adds to my creativeness and that leads to thinking about my work area, better known as the studio.  Cleaning and rearranging the work areas in my studio (AGAIN) helps me realize what my current interests are and where I need to focus my creative attention. That might not be your situation but for me, it is a huge problem.  I have many interest and find it hard to concentrate on one at a time.  So I find what works for me is having specific areas or zones that concentrate on one or two crafts. 


 For instance my sewing area has long been neglected, mending piling up and several (back burner) projects need attention. I take a hard look at each area, make note of unfinished projects and then schedule in some time each day to work on them. Each area or zone has its own projects to be completed. 

 After several weeks of devoting time to the mending project, I'm happy to say the mending is finished! Mending you say? Who exactly mends these days?!? I do, especially if it is a favorite piece of clothing I enjoy wearing.  The mending gives it character and individuality and extends the life of  the garment.  It's an old fashioned idea, but one learned from my Granny and my Mom who were thrifty sewers.  Next on the list and a long time coming is a slipcover for a foot stool. Stay tuned for that!


My little desk wasn't functioning as previously envisioned for sewing so I switched it out for a larger/longer work surface which also doubles as a crafting surface when Little Misses Sunshine and Lollipop come over. The larger work surface seems to be working well with plenty of room for sewing, painting and craft projects for both the little ones and for myself as well. And the smaller desk is conveniently located to allow both girls their own space if needed <wink> or for me to supervise the activities. 


After setting up the sewing/craft area the little desk now doubles as a beading and stamping area. This area/zone is where I will spend hours making beaded jewelry and working on my journals and stamping projects.  The drawers conveniently hold the on-going beaded projects and houses the stamps and journals so the area can be easily converted for Misses S & L to use if necessary.


                                                     It's a happy area!


 I continue to purchase beads (but on a more discriminating basis) to add to the collection.


                                       Several new designs are in the works.

One of the beading projects involves these shiny pink faux crystal buttons pictured above.  But you'll have to stay tuned for that one, I'm not giving up the details yet.

Over at the art table where I confess to spend most of my leisure time, I've been working in one of my art journals and there will be lots to share with you soon!  Yes, it looks messy but that's how I roll! No matter how big the surface area it seems I only use a very small area to work within. 


Happily the summer is rolling along and we are enjoying it.  What are you doing this summer?  I hope you are finding time to......

Be Creative!
Suzy

Thursday, August 8, 2013

INSIDE THE STUDIO PART 1

Hi Everyone!

Welcome to Brees Mimi Design Studio! So happy you are joining me today as we take a peek into the room where I create.  

Remember last week the WARNING about the messiness and chaos that abides in my studio? Enter at your own risk!

There was tremendous temptation to clean up beforehand and admittedly I did tidy up (vacumned) a wee bit before my friend's visit, but it is still very messy indeed. Ok, I am going to stop apologizing for my messiness. 

 COME ON IN!! 

As you enter the studio (aka spare bedroom) you will see in the far corner a little table known as "sewing world", to the left is "art cart", to the right is small rolling cart with scissors, glue, and sewing supplies.   I'll explain these sections in more detail in later posts, for now we will just see the perimeter spaces. 

To the right of "sewing world" is where you will find me in my favorite place....at the "work table" where most of the creativeness goes on.

The Work Table at the moment is piled with hand painted pattern paper and journals I've been making. Oh there are the usual suspects that "live" in this area: paints, glues, brushes, etc. and the "bulletin boards" or as some people like to call them "idea or inspiration" boards. 

 To the right of the work table is a "drawer stack" housing more paint, spray, stencils, pencils, watercolor crayons and glitter.  The boxes stacked on top are gelli prints and stencils. The picnic basket underneath holds miscellaneous items such as a mini crock pot, applique iron, bubble wrap and paper towels, etc. Under the basket that holds up the whole shebang are two plastic bins, one filled with minky fabric (don't ask) and the other with old cross-stitch and craft magazines that belonged to my mother. 

The lime green double closet with hot pink trim is home to neatly organized projects in progress, knitting, cross-stitch, quilting, thread, large bins of fabric and watercolor supplies. The right side of the closet is "bead world". Also in that side of the closet is extra quilt batting,  projects to finish, and a filing cabinet with patterns. It is pretty organized in there.  


 Oh and there is a colorful bar chair holding a three tier mesh office filing system (LOL) that is primarily a place to "file" sketch books, journals and other various papers that haven't made their way into a bin (trash or otherwise). More "filing" in the basket underneath and in the blue cloth bin that is behind the door. 


On the opposite side of the room are a system of cabinets which hosts my picnic basket collection on top (all labeled, organized storage). There is a row of cabinets along the top, a full length storage unit at one end, a pegboard and work (lol) surface (mainly a catch-all) and cabinets below. It takes up the whole wall and I would like to say it is pretty well organized with paper supplies, embellishments, cutting machines, crafting supplies, stamps, collage materials, more watercolor brushes, palettes and paints. 


That's it for today, I'll let your imagination fill in the rest!  


Although I do feel a bit embarrassed to share the untidiness I know that you creative people out there KNOW and appreciate the realness of a working space. 

Next week we'll dive in a bit deeper (promise it will not be cleaned up or neater than it actually is). 

Till then....BEE Happy. BEE Creative!

Suzy


Tuesday, April 23, 2013

LAPTOP SLEEVE ON THE GO


Hi Everyone!

My old laptop recently retired after 10 years of excellent service.  I needed to replace the oldie with more updated features. Skype, I’m all geeked up about THAT feature!! It drives my family and friends crazy because I want to Skype.  

Knowing that we would soon be traveling I wanted to get a nice laptop sleeve to protect and carry my new baby (laptop) in. Searching around locally and online nothing in the pre-made laptop sleeves appealed style-wise. SO, I Googled “laptop sleeves” and found the perfect pattern on Crap I've Made blog, you can check it out here.  I love the zippered sleeve, especially for traveling and loved, loved, loved the embellishment details! 

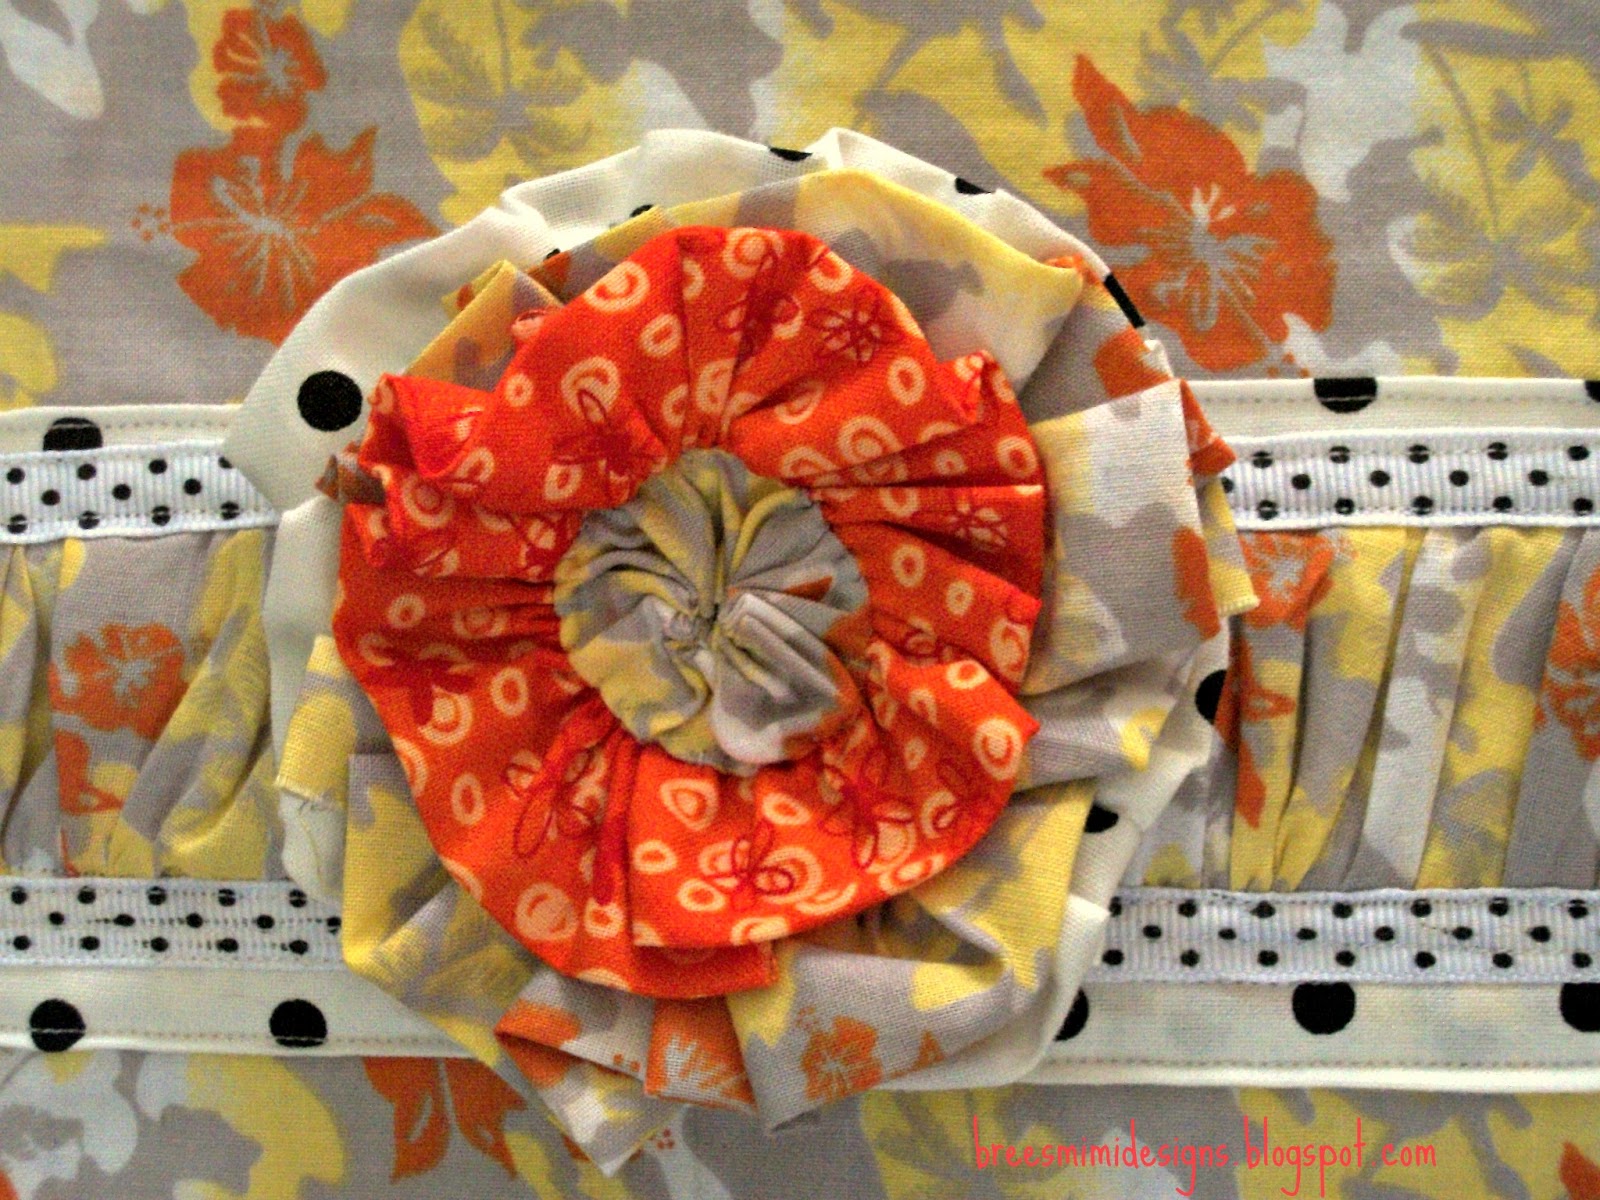
A quick check in the fabric stash and would you believe it, not a piece of fabric that jumped out!?! LOL! With time running out (only 1 day to sew) I dashed to Wally World (Walmart) and fell in love with a black polka dot on white background (love me some polka dots)and a printed black fabric (I know, ho hum...) When I got to the cutting table and was waiting F O R E V E R, I spotted a  lovely piece with orange hibiscus, gray palm trees and a bit of yellow mixed in. PERFECT. I ditched the black fabric. Gleefully I purchased fabric, iron on fleece and a nice long zipper (I went for the heavy duty jacket zipper) and rushed home. Later I found the orange dot fabric in my stash to use on the detachable flower pin.

I’m pretty pleased with the way my laptop sleeve turned out following the easy peasy pattern/tutorial.


 BTW, I made up my own flower pattern and it is detachable. Love the way it looks.


Oh, I lined the inside of the sleeve with the polka dots and each time I unzip the sleeve, it makes me smile!
Happy Sewing!
Suzy

Linking to:Sew Many Ways

Thursday, February 28, 2013

ROLLING ALONG

Hi Everyone!

February is a really short month with lots of activity around here with family, church,work and on-going art, craft and sewing projects, etc. The month has quickly slipped by.   
     
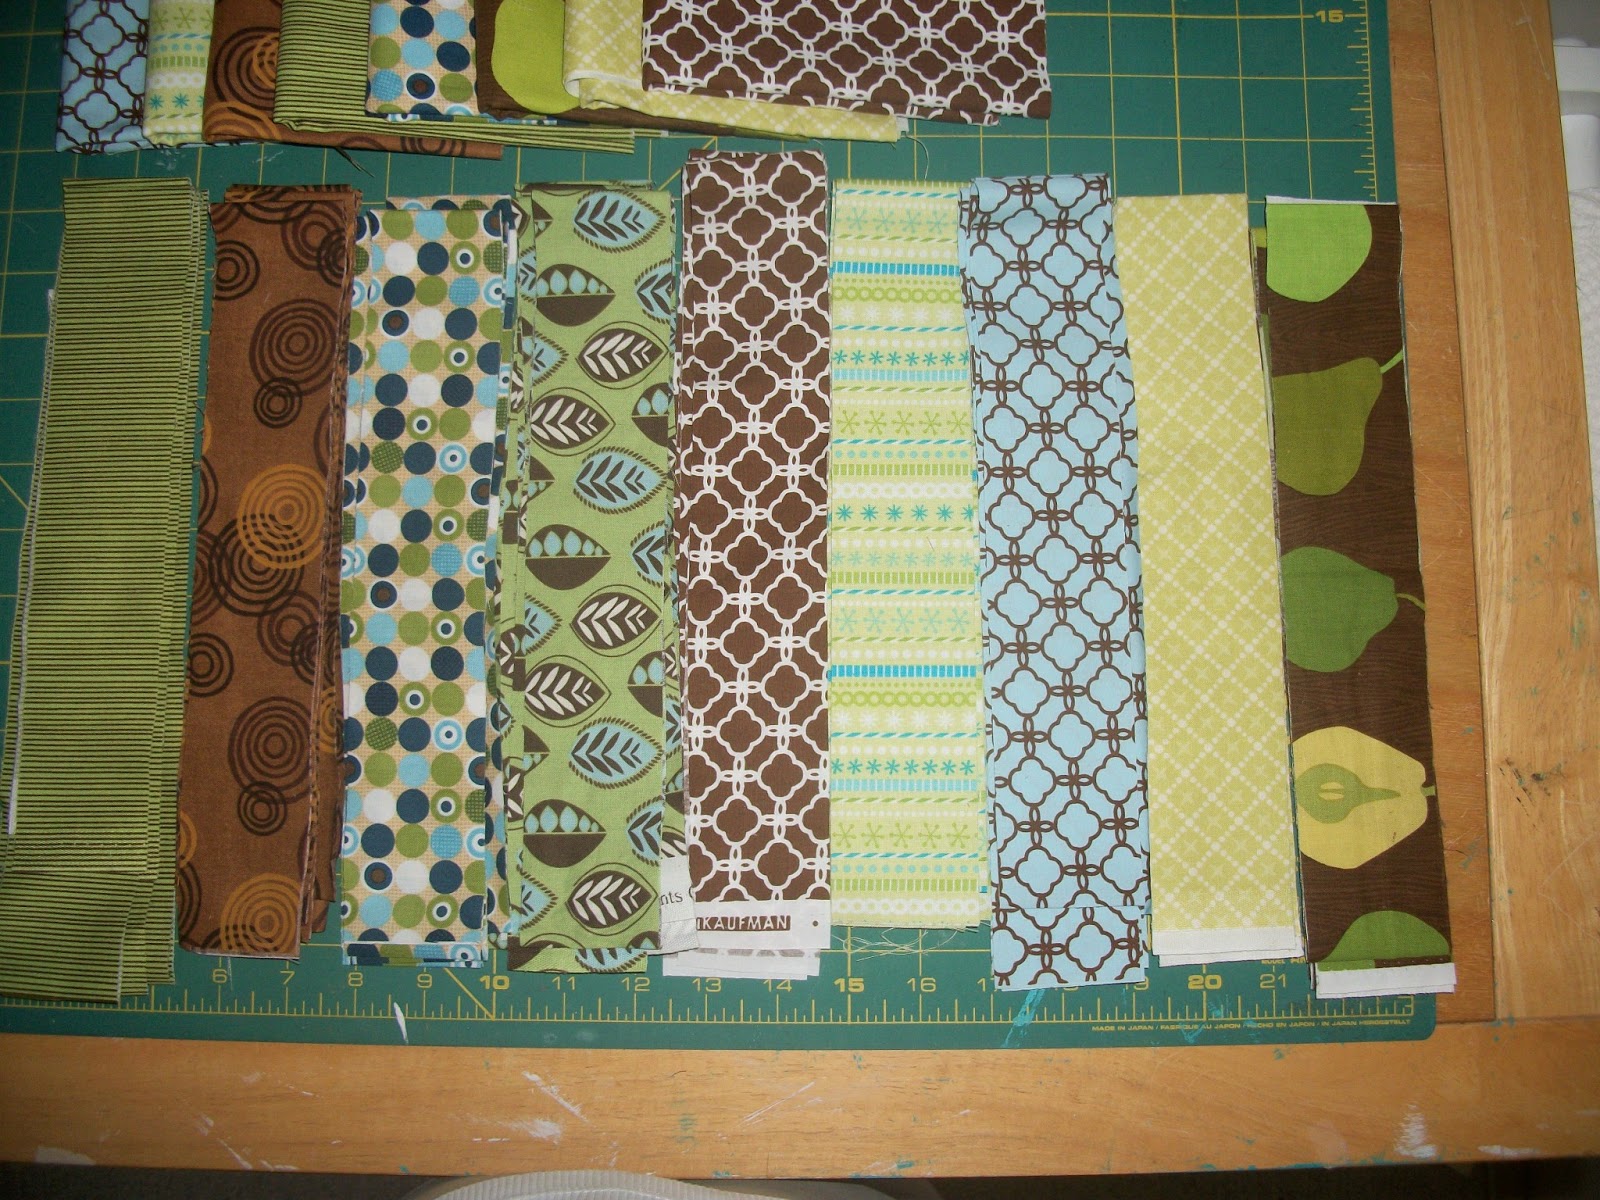
The fabrics I ordered on line arrived and have been cut and sewn into strips for the Chinese Coin Baby Quilt I am making for my soon to arrive grandson. 

My DD and I collaborated online to select the fabrics. She has a vision in her head about what she wants the nursery to look like and so....we collaborate to get this 'vision' out into quilt form.

Chinese Coins is a wonderfully  versatile (and easy) quilt pattern that  works well with a bold modern print and your not so typical baby colors. We've selected a palette of greens, browns and blue. 

We will be choosing a background fabric to pull the design together so be sure to check back with me next week to see what progress has been made! 

Until then....
Bee Creative!! 
Suzy
Linking to: SEW MANY WAYS ; CLUCK CLUCK SEW

Monday, February 18, 2013

ON A ROLL WITH CHINESE COIN QUILTS

Hello Everyone! 

     In my last post I was headed North to visit with and celebrate my best friend's 65th birthday. We have so many interests in common it is hard to narrow down the craft supplies and show-n-tell (as every quilter knows, there always MUST be a show-n-tell) plus we have birthday and Christmas gifts to exchange and the packing list grows larger and larger.  My DH watches as I bring out the last of the bags/boxes, luggage and finally a sewing machine and he comments something like " I thought you were going for a weekend, not moving out!"  Haha, but seriously, the trunk of my car was FULL!  Well, we DID plan to work on a quilt project, hence the sewing machine (I don't know about you, but I don't feel comfortable sewing on someone else's machine). 

     Last time we were together we each started cutting strips for a black and white Chinese Coins quilt. The Chinese Coin quilt is pretty easy to make and doesn't require much concentration, so we can yak and sew and accomplish our goal for the weekend. If you haven't ever made one of these simple strip style quilts go check out the how to here.  My DH loves the one I made for him (photo), it was so easy! 
Chinese Coins made for hubby
     If you like scrap quilts this is a perfect pattern to use up a variety of patterns and colors and it makes a stunning quilt. I even used Chinese Coins to update a rather plain pillow by sewing on a strip of color! 


Update a pillow with Chinese Coins pattern
    As you imagine the variations on this theme are endless. We once had a quilt gathering where each member was asked to bring 20 strips of cotton fabrics cut into 2.5" x 44" strips (across fabric width=44") to share with others plus 1.5-2.5 yds of fabric (we suggested a multi-colored print,or solid or muslin) to use as a background to their strips.  We tossed the strips into a paper bag and had each participant pull out 20 random strips (no peeking!). They were instructed to sew the 20 strips into sets of two, then sew them into groups of four, etc. to form long strips. The strips can be cut in half and turned to create more variety in the assembly process. After strips are sewn into long rows then the background fabric can be cut into dividing strips and sewn to each pieced section. It is so much fun to see how the quilt tops turn out and sharing with your quilt buddies is the best! Have fun!! 

     I love the mixed up craziness of randomly putting two prints together but with the black and white fabrics it is easy to fall into sewing them into b+w over and over again and then you get a bit of a jailbird look. SO, I broke the rule of B&W and added in some cream and gray. One of my favorite fabrics is an oriental print with a touch of red so I am also adding a red & black print just for a bit of variation and pizzazz.  Well, it is my quilt after all and I am allowed to make it the way I like....lol!  My BFF gave up on the B&W and spent her time cutting fabrics for an Envelope quilt for her newly painted and decorated bedroom! I'll share that pattern information with you next time, it is a favorite pattern that makes a beautiful scrappy quilt. 


    I don't know when the Chinese Coins quilt top will get done, it may take me several more girlfriend trips but eventually I will get the pieces together and a quilt will be born.  Speaking of being born, my grandson is due shortly and I'll be making a quilt for him and taking it to Texas to welcome him into the world! I've ordered fabrics online from www.fabric.com. ( I love being able to play with the fabrics on their design board before making a purchase)! Can you guess what pattern I'll be using to make the baby's quilt? 

    There's never enough time to spend with my BFF! We had such a great time together! I hope you will check back soon to see the progress on the two quilts. Until then, keep sewing and creating! 

Bee Creative,
Suzy 


Linking to: SEW MANY WAYS ; CLUCK CLUCK SEW

Friday, September 21, 2012

UFO FRIDAY

Hi Everyone! 

Hooray! It's Friday! In offices all over the world people are shouting Hooray! It's Friday! Everyone is geeked up for the weekend and having a bit of fun and relaxation, time with the family and friends and to tackle those DIY projects around the home. Or maybe you might be chillin' and grillin', whatever you are planning have FUN!  

Not long ago I went into declutter and clean out mode in my craft room.

Monday, May 7, 2012

Basket Make Over

Hello Everyone!


I'm pretty excited today to reveal the Basket Make Over I posted about finding at the thrift store. Originally the basket was pink and cream on the outside and blue gingham check on the inside. The lining was pretty stained and beat up but the price was good so I figured it could be revamped with a new lining and be put to use as storage in the studio.  So without further ado, here is the newly re-made basket! 


And with a little new fabric from Swell by Urban Chicks for Moda, we have a new look!  I sewed the lining and added a pleated ruffle and used red binding tape to finish the edges. There was a slight error on my measurements so I just came back in with some more dotted fabric above the red binding. Everything was hot glued into place.  


This is the lid area where I used red craft felt and a piece of snap tape to finish off the edges. The corners are faux mitered due to the challenges of using a HOT glue gun in a tight space. To faux miter the corners I laid down strips of tape on each short side corner to corner, on the long sides I folded the corners to make a mock miter. 


I rather liked the outside of the basket in its cream and pink and so I chose to just enhance the pink a bit with a my dressmakers chalk. I found it by accident in my sewing drawer when I was looking for something to mark the felt. Who knew it was almost a match for the pink already on the basket! I rub it on the ridges and then sprayed a light coat of clear spray over it to keep the chalk from rubbing off.  


Keep your eyes peeled for old baskets at thrift stores and garage sales, they are easily transformed into great storage pieces!  


Happy Crafting! 


Linking to Sew Many Ways http://www.sewmanyways.blogspot.comhttp://boogieboardcottage.blogspot.com/

Monday, February 20, 2012

A Little Valentine Love

Hello Everyone!


Valentine's Day was a week ago,  but I thought you might like to see some handmade Valentine cards made for those special people in my life.


                A vintage look made by gathering a rose tissue paper to make a ruffle along the  edges of the card.
                                  I gathered more pink tissue paper to give the heart an added dimension.
                                        I went for a Vintage Valentine with Modern twist look here.
                                                       This is the Sweet Heart Look.
For my girls. 

Hand stamped "lovelovelove" on background. Love Love Love the white XOX in white gel pen. 


I made these t-shirt nighties for my granddaughters. 
The gathered ruffles on the sleeves and hem are made from recycled t-shirts I cut up for this project. 


                                             The hearts are free-hand and hand painted.


 Hope you had a wonderful Valentine's Day and that you had the opportunity to do something special for your loved ones too! 
Suzy