Tuesday, August 28, 2012

Wedding Day Beads and Baubles

Hello Everyone! 

FLASH BACK: About 20 years ago it was love at first sight when I walked into a bead store to look for embellishments for a crazy quilted/silk embroidered purse I was making.  Every day, I would go to the bead store at lunch time and admire the bead work, soon the shop owner and I became friends and I signed up for my first workshop. My daughter, Amanda was 13 at the time and asked if she could come too, so I pleaded with my new friend to allow me to bring her along to an adult class. At first she was very hesitant to have a child in her class, but eventually she said OK when I assured her that Amanda was a very quiet child and well behaved. Turns out Amanda was a quick learner, good with beads and impressed the shop owner when she designed her very own project!  Well, that is how I got into beading and making beaded jewelry and where Amanda learned a love for crystal beads! I'll post some photos of our first beading projects soon. 

You must be wondering what this has to do with Wedding Day Beads and Baubles!  I guess it just reminded me of how we got started and where it has lead us to the beaded projects that I'm sharing now! 


First, before you get to see the wedding projects,  Here's a  shout out to my DD and DSIL on their FIRST Month Anniversary! Happy Anniversary you two love birds!!

PRESENT DAY: And now....I'd like to share a few handmade wedding accessories with you!  Amanda asked me to look at the hair pins she was considering as a purchase for her wedding day hairstyle. I checked them out and asked her if she might like me to make her some instead. She said she would love for me to make them so here's the design I came up with below (BTW not anything like the ones she was considering).  Please excuse the laundry list included in the photo!  
Pearl and Crystal Hair Pins 
The hair pins are made with almond colored pearls and clear crystals wired to a bobby pin.  Here's what they looked like in her hair below.
Hair pins 
It was a JOY to make something for my daughter to wear on her wedding day! 

NEXT PROJECT: Mama needs a necklace for the wedding! 


This is one of my favorite patterns! The beads are different sizes and make a wonderful spiral necklace.  I used pearls, crystals, metals and seed beads in creme, almond,copper and gold in the main piece and clear crystals and almond pearls for the single strand necklace.  
Spiral Pearls and Crystal Necklace
LAST PROJECT: Mama needs a purse for the wedding! 

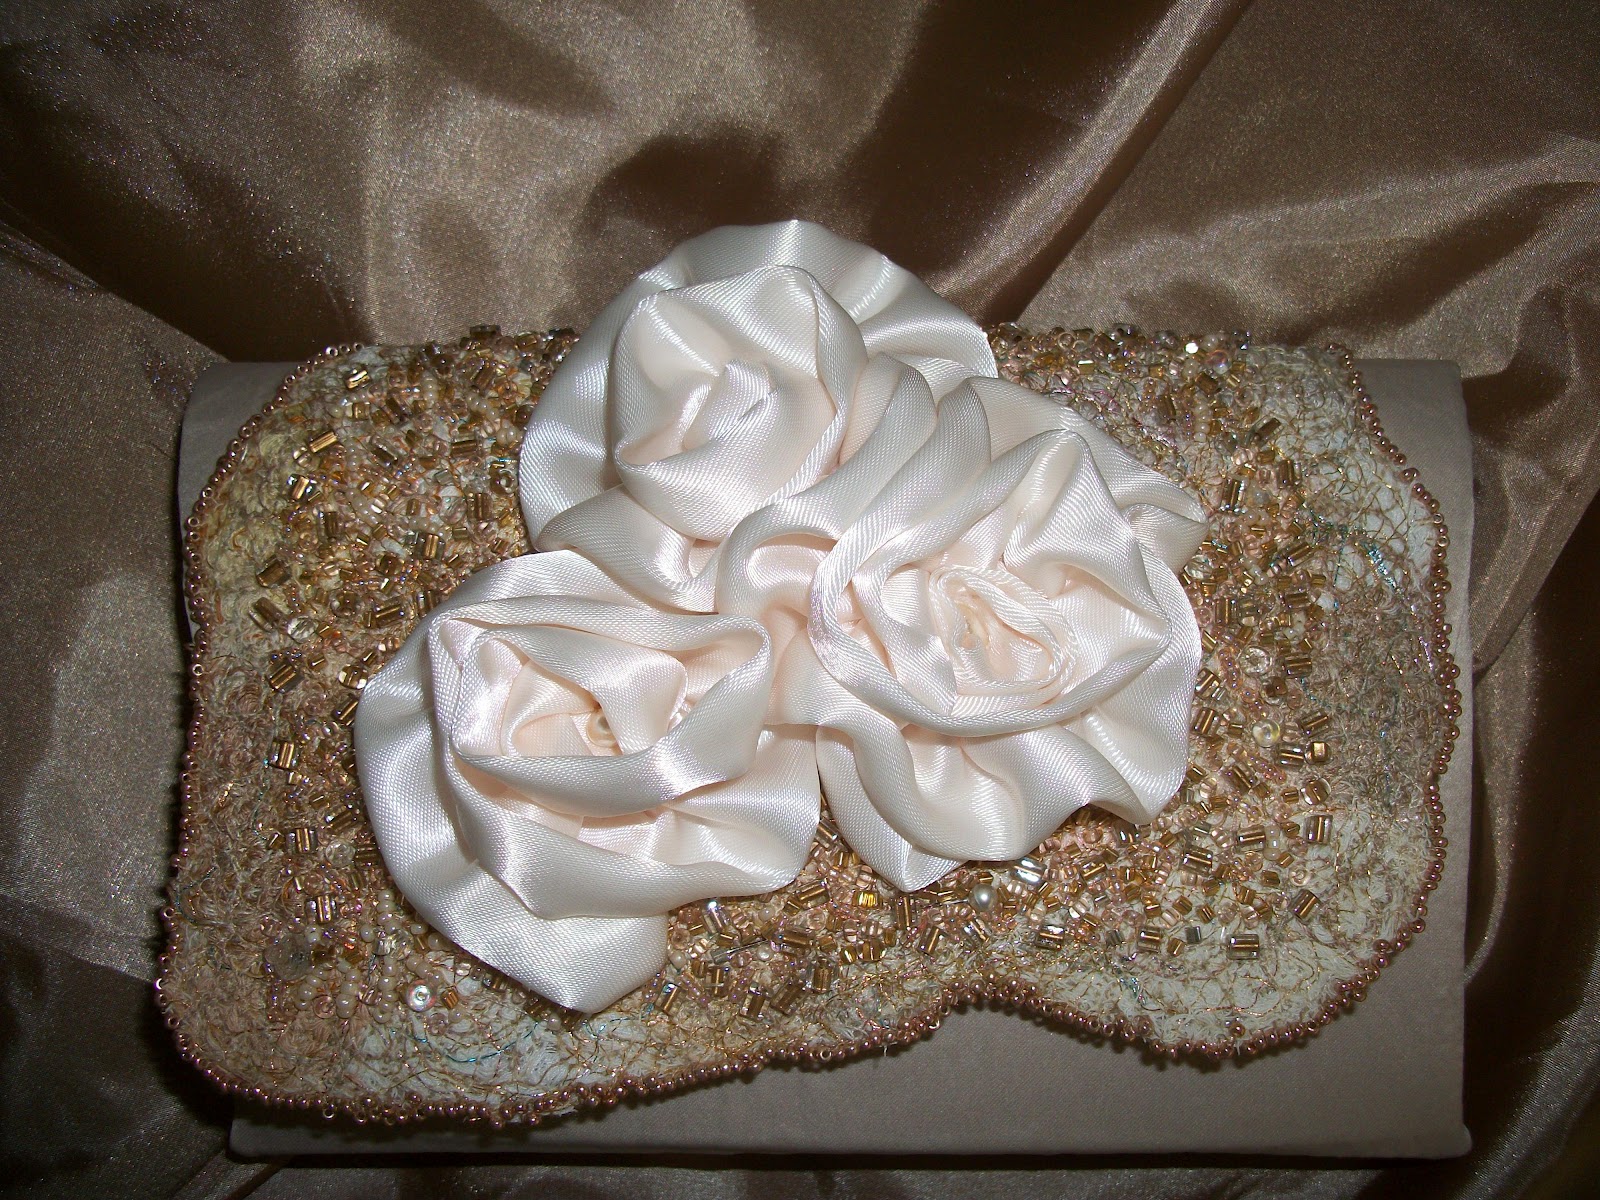
I tackled my last project about a week before the wedding! I needed an evening bag and since I couldn't find what I wanted I made it!  The base of the purse is made of latte colored satin, envelope style (with gussets at the sides to make additional room inside) and a magnetic closure. The heavily beaded applique piece is actually a fabric created from sewing threads, beaded and then appliqued to the front flap of the bag! OK, Ok, I do realize that saving odds and ends of sewing thread is a bit odd, but over the years of sewing and quilting, I have amassed a collection of thread snippet left-overs. In my defense, they are organized by color and stored in plastic baggies to be used in making applique bases and designs. It's a form of recycling/upcycling. Anyhow, it is the perfect "fabric" base for beading, drapes nicely over edges and works well as a support for design. The threads are encased in a water soluable stabilizer and heavily sewn over with metallic threads in a random way to secure the threads and afterward the "fabric" is embellished with beads.  The roses are also handmade from satin ribbon and add a nice finishing touch.  

Beaded Evening Bag 

Thank you for stopping by to visit and I hope you have enjoyed the wedding projects I've been sharing with you!  I'll be posting our Seed Bead Applique Designs soon, so please come back again.


Suzy


Linking to: http://twenty-eight-0-five.blogspot.com/-Potpourri Friday


Wednesday, August 22, 2012

Flower Girl Basket & Wedding Aisle Decorations

Hello Everyone! 

Last week I shared with you a tutorial on how to make the Wedding Card Box, and in keeping with the wedding theme, today I'd like to share the basket I hand-made for our Flower Girl.  
Materials for Wedding Card Box, Flower Girl Basket and flowers. 

I took the original basket (above) in dark brown and transformed it into the one you see below.  
Flower Girl Basket


The outer basket is padded with a bit of cotton batting and is gathered on the bottom and a separate circle cut from a file folder is used to cover the bottom gathers and stabilize the basket. It was hand sewn into place to keep the bottom flat. The inner basket lining is also gathered at the bottom with another covered circle piece placed at the bottom.  

After wrapping the handles with satin ribbon, I didn't like the look of where it attached to the basket. Normally one would just add ribbons and fru-fru to cover up the handles but Amanda was going for something less frilly. There was also a seam where the two linings were sewn together that I didn't care for on the edge of the basket, so I decided to add some pearls to cover that up. Well, a few pearls later....and the final touch was adding  a big silk flower to one side and called it done. 

Here's another wedding craft project you might want to consider: making your own aisle decorations!  Easy enough....I Googled "wedding aisle decorations" and a bunch of ideas popped up! .  I made these paper cones to hold white hydrangeas in the wedding theme colors. 
Flower Cones 
Here's where I got the idea of how to make the Flower Cones: Thanks to diy.weddingbee.com and inspiration from Flower Cones by rosesandhydrangeas for the great tutorial. 

I hope you have enjoyed the glimpse into my wedding crafting and will be inspired to try your own wedding craft too!  

Blessings,
Suzy

Linking to: http://www.freckledlaundry.com & http://sewmanyways.blogspot.com


Monday, August 13, 2012

Wedding Project: DIY Card Box

Hi Everyone!

I'm back to share with you one of the wedding projects I made for my daughter Amanda's wedding! Unfortunately, I didn't think to take photos of the process (actually, that's probably a good thing...I'm rather messy and haphazard when crafting). 

At first I thought everything Amanda asked me to make would be easy-peasy! Not that they weren't easy, but as always I equate EASY with FAST, not time-consuming. She had definite ideas of what she wanted in design, style,colors and even some samples she had pinned to her Pinterest boards.  I of course, do not follow directions well <grin>, always need to make something my own...I don't know if that is the rebel in me or if it is the creativeness. Anyhoo, let's say I'm the queen of improvising on a theme.

My first project was the Card Box which actually is used to keep the guests cards in one place and safe during the wedding/reception.  I love the idea of it looking like a wedding cake! She wanted simple and elegant...so it is, but with some extra bling-bling. LOL! I was inspired by the many beautiful handcrafted boxes being sold on the Internet, however the  cost of these lovely creations simply wasn't in our budget AND we knew it could be made by MOM <wink>. 
Card Box


So of course, off to the craft store I went for supplies:
  • set of nesting brown craft boxes (Joann's Fabrics)
  •  3/4" Cream & 1" Latte & 1/2" White Satin ribbon on rolls
  • white craft paper (Dollar Store)
  • Glue dots & Glue runner tape (Joann's)
  • Elmer's craft glue
  • Aleene's Tacky Glue (Joann's)
  • White Satin fabric for flower 
  • Almond Pearls and Clear Crystals (Hobby Lobby)
  • Clear crystal bling and pearls (on back of box)
You'll also need: 
  • ruler
  • craft knife
  • cutting mat
  • foam brush or old credit/gift card
  • Hot glue gun
  • patience, lots of patience! 
I stacked the boxes from largest (bottom) to smallest (top), traced around the shapes on each box so I would know where to adhere them later. With an craft knife on the top box lid (only), I cut a one inch wide opening by length of box lid, leaving at least a one to one and a half inch space to each side. The other two box lid openings were cut one inch inside the marked lines on the two larger lids and bottom of the smallest box and middle box. Leave plenty of space for the card to make it into the largest box. There are several You-Tube videos that might be helpful in understanding this concept if you are having trouble visualizing it (wedding card boxes). 

The brown boxes were prepped with gesso (option:white craft or spray paint) so the brown wouldn't show through the white craft paper (it was pretty thin).  Next measure and cut the white craft paper for each box lid (you will cut the holes out later). Adhere thin layer of glue using an old credit/gift card or foam brush to spread the glue evenly. Wrap edges of box tucking excess paper under the lid or to the inside of the box (no one is going to see it).  To cut the box top holes into the craft paper imagine a straight line down the center of the opening (you can draw one too) and cut the line with craft knife leaving about 1" from the end of each short end. Next cut the corners diagonally, tuck everything in and glue to the inside, trim excess paper as needed.  

At this point I decided the white paper looked too plain so I embossed a swirly design in the middle of the boxes on all sides. Keep in mind that the ribbon will cover the bottom and the box top also would be covering a portion.   Be sure your embossing is dry before you go on.  Next, measure the bottom edges of the boxes and cut ribbon 1" longer to tuck under.  I used two methods to adhere ribbon to the boxes: glue tape runner on the base ribbon (sturdy hold) and tacky glue on the top ribbons. I also glued ribbon around the box lids, the end of the ribbons were tucked under and held in place with glue dots. I added a Pearl and Crystal bling to the back for embellishment. 

Hot glue boxes together, centering them in place over the holes previously cut.  I also glued the lids down to make the box secure (in case it toppled or someone wanted to peek inside). I printed the white card stock label (on computer using Word) with the bride and groom's name and wedding date; layered to larger card stock (latte) and used Glue Runner tape to adhere to front of the middle section of the box.  The white satin flower was made according to directions from Martha Stewart. You can get the directions here http://www.marthastewartweddings.com/226604/silk-flower-ring-pillow.  I modified the flower to a smaller size for the card box, opting to hand sew the petals together and added centers made from pearls and clear crystals. I also used this pattern from MS to make the ring bearer pillow (below).  

Ring Bearer Pillow


Inspiration comes from everywhere!  I hope you will be inspired to try your hand at making your own wedding crafts. Have fun and make it your own !
Suzy


Thursday, August 9, 2012

A Beautiful Wedding Day


Hello Everyone! 
WARNING: MANY PHOTOS 

It was a beautiful summer day when our daughter Amanda was married to her long-time love, Fabian.  The wedding was held at the historic Casa Marina Hotel on Jacksonville Beach. The Casa Marina is a charming hotel that was built in the early 1900's, it features a lovely courtyard that faces the ocean and is a very popular spot for weddings.   www.casamarinahotel.com.
The Casa Marina at Jacksonville Beach, Florida

Our girl Amanda looked beautiful in her wedding gown, she glowed with happiness and true beauty both inside and out. I couldn't believe how calm the bride and bridesmaids were while getting their hair and makeup done, dressed and ready for the photographer. No Bridezillas in this wedding party! 

The Bride
Amanda and Fabian's daughter, Destiny getting ready for ceremony.


Everything was going as planned until right before the ceremony was to begin...being summer, at the beach and late afternoon, there was a brief rain shower!  My darling grand-daughter, Brianne was in the bridal suite looking out the window at the courtyard venue and trying to blow the clouds away! LOL!  
Here Comes The Bride 

Mr. and Mrs.


Down to the beach for photos! 

Bride and Flower Girl: Amanda and Brianne
Groom and Ring Bearer: Fabian and Nick

Bride Amanda with Flower Girl Brianne and Ring bearer Nick 

Bride and Groom with Flower Girl

Wedding Party 
Amanda's bouquet was cream roses with green cymbidium orchids wrapped in cream ribbon with pearl studs. I was so touched that Amanda wanted to carry her bouquet with her Mimi's jewelry attached as part of the "something old and borrowed". The gold rose pin and cameo belonged to my mother who passed away eleven years ago, she would have been so proud to see her "little weetie" Amanda getting married! 


L-R: Mother and Father of the Bride: Rich and Susie,  Mother and Father of the Groom:  Maria  and Mario .

Here she is dancing with her Dad to Nat/Natalie King Cole's Unforgettable.  When she was little her Dad would come home from work and pick her up and dance with her around the room to a song called "I danced with the dolly with the hole in her stocking."  Amanda gifted her Dad with a beautiful picture frame that holds a photo of them dancing Then and Now and says:" From dancing with the dolly with a hole in her stocking to dancing with you at my wedding. Our dances will always be unforgettable.  As unforgettable as you....I love you, Dad". 

Fabian dancing with his mother, Maria. 

It was an unforgettable evening at the Casa Marina for the Bride and Groom and their families and friends! 


Grand daughters: Lyla and Brianne

Amanda's brother Chris and his baby girl, Lyla.

Amanda and my BFF Bonnie share a moment before the wedding. 
Amanda and Chris the day before the wedding.

Mom and Dad with daughter Amanda the day before the wedding. 

Chris, Stephanie and Lyla at Rehearsal Dinner.

I hope you enjoyed seeing our family and the special day's events.  

 Suzy


Friday, July 20, 2012

Wedding Preparations

Hello Everyone! 


It's been a crazy few weeks here at my house getting ready for our daughter's wedding at the end of July!  Actually it has been more like months of preparation but we are headed into the final stretch, it's "get 'er done" time. 

Our daughter Amanda is the most organized bride, her planning skills (thank goodness) are exceptional and far superior than mine. She has designated Wednesdays as Wedding Wednesday, the day we discuss and update our progress, etc.  I have my assignments and she has hers. Mine are craft related, hers are planning and executing the plan.  


I'll be sharing with you over the next few weeks my designated craft projects which include making a Ring Bearer Pillow, Flower Girl Basket, hair pins for the bride, decorating fans, a 3-tiered card box, aisle decorations and making an evening bag.  

Please come back and visit soon!  


Have a wonderful day! 
Suzy

Wednesday, July 4, 2012

Happy 4th of July

Hello there!


    Happy 4th of July!  I hope you have your flag flying today and are planning to celebrate our nation's birthday with some good old fashioned fun!


    One of my favorite memories is of my mother making a cake and decorating it with a firecracker for a big family celebration. Not a REAL firecracker! She painstakingly drew a firecracker by hand and filled in the design with icing! I was pretty impressed and proud that my mom made the cake for BIG event. Everyone oohed and aaahed over it and was duly impressed. 
    Our great aunt and uncle had a beautiful home on the St. John's River and the whole family was invited to come to "the river house" to celebrate the 4th of July.  There was a slew of cousins visiting from out of town and lots of fun things for the kids to do, but every one's favorite thing to do was fishing with Uncle.  Uncle was into fishing and he had a super long boat dock and at the end was a covered area where he kept his boat. He supplied cane poles for all the kids and we would line up on the dock edge and fish with Auntie's dough balls, catching brim!  Uncle would have a big fish fry at the end of the day cooking up the catch (of course he contributed to the catch with his own catch) of the day.


    One of my favorites things Auntie made (in addition to the dough balls) was hush puppies! She made the best hush puppies you ever put into your mouth! Her secret ingredient was beer (I say secret because my Granny would have been outraged if she knew) and although most family members were clued into that "secret", Granny remained unaware and ate her fair share of them.  There were gallons of sweet tea, delicious potato salads, creamy cole slaw and golden delicious fried hush puppies to be enjoyed under the oak trees hanging with moss. We ate outside on folding tables, mismatched chairs, plastic checkerboard table cloths, paper plates and plastic utensils.


    It was a sweet time, lots of family laughter and stories to be told deep into the night. That's how it is with southern families, there are always stories to be told and passed along from generation to generation. I wish I had paid closer attention, but being a child I was more interested in playing with my cousins, chasing fire flies and playing hide-n-seek!  We would run bare-foot through the grass and swim in the cool river and have a glorious time being outdoors playing.  We made up games to play, and when we were tired, we'd get a drink out of the hose and chill on the rocking chairs on the screened- in porch until one of the adults would shoo us out to play again. Those days were golden, carefree, and some of the best days I remember as a child. 


    More importantly, as you celebrate today, I hope you will take a moment to thank God for His blessings on our nation. Please remember the men and women who are serving and those who have sacrificed their lives to protect  our country and the freedom that we celebrate today!  


God Bless America! 
Suzy

Tuesday, July 3, 2012

Verse Journal Tuesday-My Redeemer Lives

Hello Everyone! 


It's Verse Journal Tuesday again!  Just a reminder to click on Verse A Day Journal above and check out  Job 19:25.
Have a wonderful day!
Suzy